Tapered tumbler wrap size: measuring and sizing a curved wrap
A tapered tumbler's wrap is not a rectangle, so "what size is the wrap?" has three answers: the size of the cup you measure, the rectangle you design on, and the curved shape that gets printed. This guide explains all three, with the numbers for a typical 20 oz tapered cup.
The short answer
For a cup 3.50 in across the top, 2.50 in across the bottom and 6.50 in high:
- Design canvas: 9.42 × 6.52 in, which is 2827 × 1956 pixels at 300 dpi. The width is the circumference halfway up the side; the height is the length of the sloping side.
- Printed wrap: a curved band 10.89 in wide and 6.99 in tall, with a top edge 11.00 in long and a bottom edge 7.85 in long. It fits on US Legal (8.5 × 14 in) inside 5 mm printer margins.
1. The cup: three measurements
Measure the diameter (or circumference) at the top and bottom of the area you will cover, and the height between them. Two cups sold as "20 oz tapered" can differ by a few millimetres, and a few millimetres matter at the seam, so measure the cup you have. The generator's measuring notes cover where to measure and which height to use.
2. The rectangle you design on
Designs are usually made on a rectangle, then bent to the curve. The best rectangle has the proportions the design will have on the cup:
The width is the circumference at mid-height; the height is the length of the sloping side, with H the upright height.
For the example: π × (3.50 + 2.50) ÷ 2 = 9.42 in, and √(6.50² + 0.5²) = 6.52 in. At 300 dpi that is a 2827 × 1956 pixel canvas.
Because the cup is wider at the top, a design bent onto it gets slightly wider towards the top and narrower towards the bottom: here 16.7% wider at the top edge and 16.7% narrower at the bottom edge than at mid-height. Proportions are exact halfway up. No flat rectangle can wrap a tapered cup exactly once without that change, so keep circles and text that must look perfect near the middle.
3. The curved shape you print
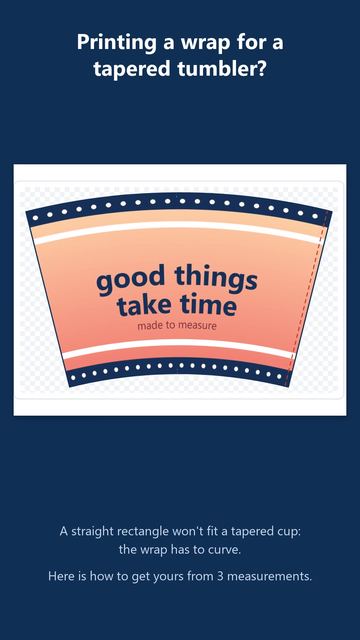
A tapered cup is a slice of a cone, so its wrap is a slice of a ring: two arcs with a common centre. The top arc is as long as the top circumference and the bottom arc as long as the bottom circumference. For the example, the arcs have radii 22.82 in and 16.30 in and the wrap spans 27.6° of a circle. The rectangle the printed band occupies (10.89 × 6.99 in) decides the paper: wider than the design canvas because of the curve, and taller because of the arch.
The formulas are on the tapered tumbler template generator page.
How the size changes from cup to cup
Example measurements only, to show how the numbers move. They are not any brand's specification.
| Top × bottom × height | Design canvas | Pixels | Printed band | Angle | Smallest sheet |
|---|---|---|---|---|---|
| 3.5 × 2.5 × 6.5 | 9.42 × 6.52 | 2827 × 1956 | 10.89 × 6.99 | 27.6° | Legal |
| 3.4 × 2.8 × 7.2 | 9.74 × 7.21 | 2922 × 2162 | 10.65 × 7.49 | 15.0° | Legal |
| 3.75 × 2.9 × 7 | 10.45 × 7.01 | 3134 × 2104 | 11.71 × 7.45 | 21.8° | Legal |
| 3.25 × 2.75 × 4.75 | 9.42 × 4.76 | 2827 × 1427 | 10.16 × 5.11 | 18.9° | Letter |
The stronger the taper (the bigger the difference between top and bottom for a given height), the more the band curves and the bigger its angle; the sheet it needs depends on that curve and on the height together. A very slight taper is almost a rectangle.
Enter your own cup's measurements, add your design and the generator bends it to fit, then gives you a true-size mirrored PDF, a 300 dpi PNG or an SVG cut file.
Make the wrap for this cupCricut: choose the workflow before choosing a file
A cut-only vinyl sleeve, a printed sticker wrap and a sublimation transfer use different workflows. The cup measurements stay the same; the file and finishing process change.
Basic Cut vinyl: use the SVG outline
For a sleeve cut from ordinary adhesive vinyl, start with the SVG. It contains vector outlines, not your printed artwork. After import, check the units and physical dimensions against the generator before making a cheap test cut. A cut-only operation does not need printed registration marks.
The export separates the cut outline from overlap, bleed and centre guides. Keep only the intended outer cut path active for cutting. Hide or remove construction guides; otherwise they can become unwanted cuts. Cricut's image-upload guide explains SVG layers and notes that vectors import as cut lines. Basic Cut does not preserve printed patterns or colours.
Print Then Cut: artwork plus room for sensor marks
For printable vinyl or a sticker wrap, use the printable PNG as the artwork starting point and check its physical size after import. Inspect the outer cut boundary; do not assume a raster upload reproduces the SVG cut outline automatically. Follow Cricut's Print Then Cut instructions to prepare the printable layer and print and cut within the same Design Space session. A Metrifold PDF is not a Cricut registration sheet.
The generator's paper-fit result allows for ordinary printer margins, not Print Then Cut sensor marks. Cricut's current cuttable-area guidance says the usable area depends on the selected machine, page size and design proportions; it is not a full rectangle. Check the entire curved band, not just the original rectangular design canvas.
Do not auto-resize a fitted wrap smaller to clear a size warning: it will no longer match the measured cup. If available, choose a larger page supported by both the printer and the selected machine. Otherwise keep the dimensions and use a suitable alternative, such as printing at actual size and trimming by hand. Converting to Basic Cut discards the printed design rather than solving a Print Then Cut fit problem.
Sublimation: mirrored print at actual size
For a transfer that you trim by hand, print the generated PDF at 100% / Actual size, or place the PNG at its stated physical dimensions in your print software. Cricut cut registration is unnecessary for this route. Enable the generator's mirror option for the transfer, then avoid mirroring it again in the printer or another program. Check lettering in the print preview and verify the scale bar before using transfer paper.
Use the paper test-fit process below before transferring. Follow the blank and transfer equipment instructions for compatible materials and heat settings; geometry does not determine the pressing process.
These are file and sizing checks, not a verified Design Space compatibility claim. Metrifold exports have been checked digitally; this workflow has not been tested here in Design Space or on a Cricut machine. Cricut documentation checked 12 October 2026.
Check it with a paper test print
- Print the blank test-fit template on plain paper at 100% / Actual size, never "Fit to page".
- Measure the scale bar on the print. If it is off, fix the print settings first.
- Cut it out and wrap it round the cup. The ends should meet along a straight line up the side. A gap at the seam means the cup is bigger than entered; an overlap means it is smaller. A gap at the top but not the bottom means the top or bottom size is off.
- Adjust the measurement that is wrong and print again. Paper is cheaper than sublimation sheets.
See why a rectangle does not fit
Engraving instead of printing?
A laser on a rotary does not use a curved template; it needs the right diameter and a pre-warped design. See the laser rotary tumbler calculator, and what to do when a rotary engraving comes out stretched.
Keep a bench reference
Print the tumbler wrap troubleshooting card for symptom-by-symptom checks and a one-page PDF.