How to make a sphere or dome pattern from flat panels
A ball, dome, hat crown or helmet is made from gores: identical pointed panels, like the segments of a peeled orange. You decide two things, the size and how many panels, and the shape of each panel follows from one formula. This guide walks through the choices with a worked 30 cm ball and a 60 cm dome.
The process in five steps
- Decide the finished size: the diameter, or the circumference measured with a tape; for a dome, its span and rise.
- Choose the number of gores (below). More gores make a rounder result with narrower, more numerous pieces.
- Draw one gore: a straight centreline half the circumference long, with the width set off at equal stations.
- Add the allowance for your material: a seam allowance for fabric, nothing for butt-glued foam, an overlap for cladding.
- Cut and join: sew or glue the gores in pairs, pairs into halves, then the halves together.
The gore width formula
At a distance s from the top of the gore, measured along the curve of a sphere of radius R, the gore is as wide as that ring of the sphere divided by the number of gores N:
The sides are not circular arcs, although many tutorials draw them with a compass. An arc is close for a few wide gores but makes panels slightly too full, which is how a scaled-up pattern ends up looking like a pumpkin. The generator plots the exact curve.
How many gores?
A flat panel can only touch the sphere along its centreline and its edges; across its width it is a chord, so the middle sits slightly inside the true surface. That gap, R × (1 − cos(180° ÷ N)), is what makes a ball look faceted. Fabric and foam stretch or are shaped to hide it; metal has to be formed. For a 30 cm ball:
| Gores | Gore length | Widest point | Flat-panel gap | Equator bevel from square |
|---|---|---|---|---|
| 4 | 47.1 cm | 23.6 cm | 43.9 mm | 45.0° |
| 6 | 47.1 cm | 15.7 cm | 20.1 mm | 30.0° |
| 8 | 47.1 cm | 11.8 cm | 11.4 mm | 22.5° |
| 12 | 47.1 cm | 7.9 cm | 5.1 mm | 15.0° |
| 16 | 47.1 cm | 5.9 cm | 2.9 mm | 11.3° |
- Fabric balls and soft toys: 6 gores is the classic; 8 looks rounder when stuffed firmly. Stretch fabric hides the facets.
- Hats and caps: 4 to 6 gores; a hat crown is a hemisphere or a shallower dome.
- EVA foam (cosplay helmets, props): 8 to 12. The right-hand column is the geometric bevel at the equator, not a constant angle for the whole edge. The generator’s station table varies that angle from the pole towards the equator. Check a scrap joint before committing material.
- Sheet metal domes: 12 or more, often with a crown disc at the top so the narrow points do not all meet at one weld.
- Paper models and globes: 12 is common; it is the classic globe gore count.
Worked example: a 30 cm ball in 8 gores
R = 15 cm. Each gore is π × 15 = 47.1 cm long and 2π × 15 ÷ 8 = 11.8 cm wide at the middle. Fold a strip of paper in half lengthways, mark the stations along the fold, set off half of each width from the fold, join the points with a smooth curve and cut through both layers:
| From the top | Full width | Half width (from the fold) |
|---|---|---|
| 0.0 cm | 0.00 cm | 0.00 cm |
| 5.0 cm | 3.85 cm | 1.93 cm |
| 10.0 cm | 7.28 cm | 3.64 cm |
| 15.0 cm | 9.91 cm | 4.96 cm |
| 20.0 cm | 11.45 cm | 5.73 cm |
| 23.6 cm | 11.78 cm | 5.89 cm |
The width at 2.5 cm from the top, for example, is 2π × 15 × sin(2.5 ÷ 15 rad) ÷ 8 = 1.95 cm: work any station out the same way. The last row is the equator, halfway along the gore; the pattern is symmetrical about it, so the second half mirrors the first.
- cut line
- centreline and marks
Change the size, gore count or material and print the gore full size, tiled on A4 or Letter, or download a DXF or SVG for a cutting machine.
Open the 30 cm, 8-gore ball in the generatorSewn-ball walkthrough: a 20 cm ball in six gores
This smaller prepared example is separate from the 30 cm eight-gore example above. Its 20 cm diameter is at the stitch line; the file adds a 6 mm seam allowance to both long edges. The stitch-line gore is 31.4 cm long and 10.5 cm wide at the equator.
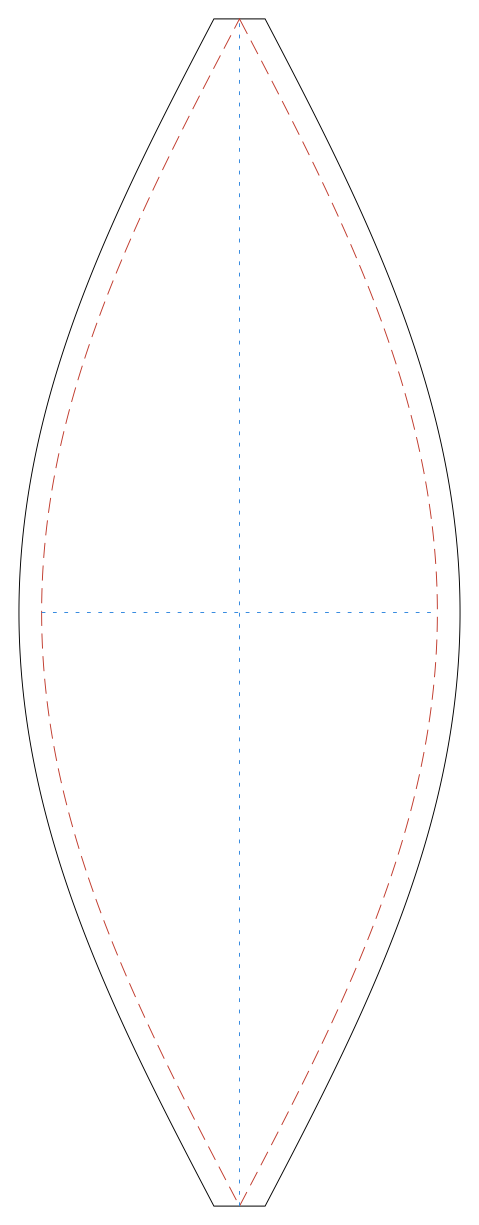
Download the 20 cm sewn-ball A4 PDF · Sample SVG · Sample DXF · Open these sewing settings
- Print at 100% / Actual size and check the calibration ruler. Assemble the tiled pages before tracing the one panel.
- Cut six pieces on the black cut outline. Transfer the red stitch line and equator marks; the blue construction lines are not cuts.
- Keep all panels oriented consistently for the fabric’s grain or stretch. Match pole and equator marks, join along the stitch lines, and leave the opening required by your chosen turning and stuffing method.
- Try a pair in scrap first. Fabric stretch, seam bulk and stuffing change the assembled shape; six mathematical gores do not certify a finished diameter. For a different size or gore count, change the generator settings rather than scaling the seam allowance.
Verification limit: the sample’s files and geometry have been checked digitally. This is a planning walkthrough, not a photographed or physically tested sewing project.
EVA foam walkthrough: outside size and thickness are separate inputs
The prepared foam example uses 350 mm outside diameter, 10 mm material thickness, eight full-sphere gores, and no seam overlap. The uniform-shell model subtracts half the thickness from the outside radius: 175 − 5 = 170 mm. Its mid-surface diameter is 340 mm, and one gore is 534.1 mm long with an equator width of 133.5 mm.
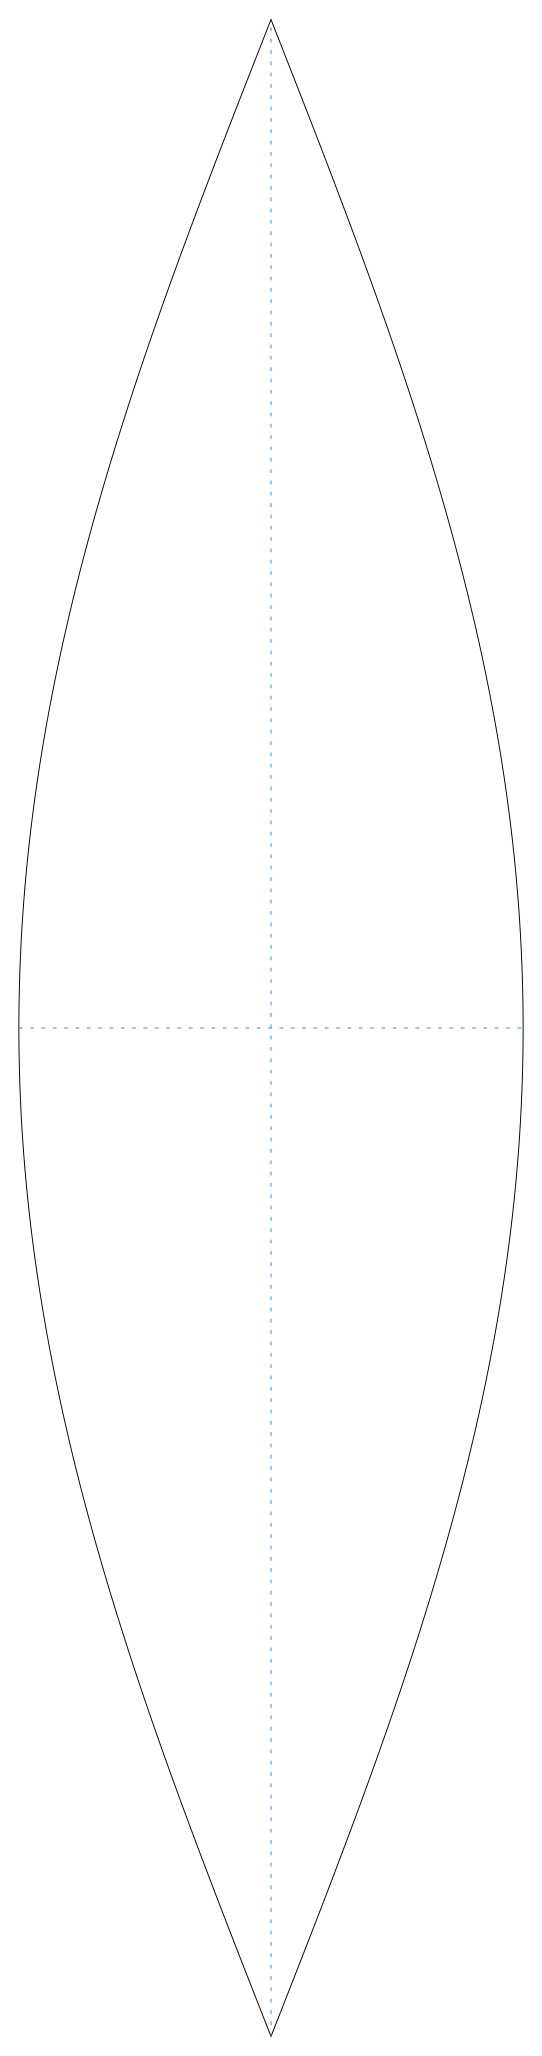
Download the 350 mm foam-model A4 PDF · Sample SVG · Sample DXF · Open these foam settings
- Choose whether your target measurement is inside, outside or mid-surface. Enter the actual thickness; an outside measurement is not interchangeable with a mid-surface one.
- Make an actual-size paper mock-up and check the ruler before transferring the black outline to material. Butt joints use no sewing overlap in this example.
- Mark the centreline and equator as references, not cuts. The model’s per-edge bevel runs from zero at the pole to 22.5° at the equator; consult the station table instead of applying one angle along the entire edge.
- Test your shaping and adhesive method on scrap and follow the material and adhesive instructions. This model does not simulate heat-forming, foam compression, glue thickness, joint strength or fit on a person.
The 340 mm mid-surface conversion is verified arithmetic, not evidence that a real 10 mm EVA assembly finishes at exactly 350 mm. Measure a trial assembly before making a fitted prop. For a dome, use Hemisphere or the span/rise mode; the existing 60 cm dome example below is a different shape.
Domes: from span and rise to radius
A dome that is less than a half sphere is a spherical cap. You usually know how wide it is across the opening (the span, c) and how high it rises (h). The sphere it is cut from has radius:
For a dome 60 cm across and 20 cm high: R = (900 + 400) ÷ 40 = 32.5 cm. In 12 gores each piece is then 38.2 cm long and 15.7 cm wide at the rim. A dome as high as half its span is a hemisphere; a higher one is more than half a sphere, and its gores get narrower again towards the rim. Open the 60 cm dome in the generator.
Seam allowances and thickness
- Sewing: the drawn line is the stitch line. Add the seam allowance outside it at a constant width, and do not scale it up with the pattern. With many gores, a small top disc avoids a lump where all the points meet.
- Thick foam or metal: draw the pattern at the middle of the thickness. A ball measured to the outside is drawn on (outside diameter − thickness), as a uniform-shell geometric approximation. This does not predict foam compression, adhesive joints or material forming.
Related: a cone or a reducer is the other shape that is made from flat sheet with a curve; see the cone flat pattern formula.