How to use this cone pattern calculator
- Choose millimetres or inches, then enter the large end diameter, the small end diameter and the vertical height between the ends.
- Say whether your diameters are to the inside, outside or centre of the metal. For inside or outside, enter the material thickness so the pattern is developed on the mean diameter.
- Optionally add end allowances, a seam allowance (with fastener holes along it), split the pattern into several equal pieces, or add roll guide lines.
- Check the preview. The outer and inner radii, sweep angle and chord are shown on it.
- Download the PDF and print it at 100% / Actual size. Measure the 100 mm and 4 in rulers on the first page before cutting anything, then trim and tape the pages together using the registration marks.
- Or download the DXF (for CAD, plasma, laser or waterjet) or SVG (for vinyl and craft cutters, Inkscape or Illustrator).
How the flat pattern is calculated
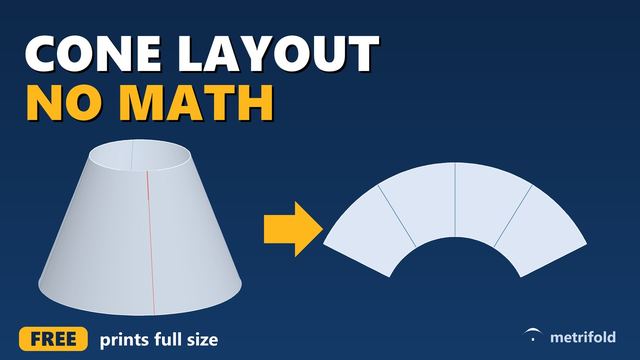
The side of a right circular cone unrolls into a flat annular sector: the region between two arcs that share a centre (the cone's apex). With large-end radius R, small-end radius r and vertical height H:
Two quick checks: the outer arc length L × θ (in radians) equals the circumference of the large end, π × D, and L − ℓ equals the slant length. A full cone is the special case r = 0, so the inner radius is zero. When both diameters are equal the formulas break down, and the calculator switches to a cylinder, whose pattern is a rectangle π × D by H.
Worked example: D = 600 mm, d = 300 mm, H = 400 mm gives R − r = 150 mm, s = √(400² + 150²) = 427.2 mm, L = 427.2 × 300 ÷ 150 = 854.4 mm, ℓ = 427.2 mm and θ = 360° × 150 ÷ 427.2 = 126.40°.
The calculator's geometry is checked by automated tests against independent reference calculations, a published worked example, and a numerical model that unrolls a finely triangulated 3D cone.
To mark a pattern out by hand from these numbers, with a trammel or with chord offsets when the radius is too long to swing, see the cone flat pattern formula guide.
Inside, outside or centre of the metal?
When plate is rolled, the outside stretches and the inside compresses. The mid-thickness keeps its length, so fabricators lay the pattern out on the mean diameter: inside diameter + thickness, or outside diameter − thickness. Laying out thick plate from the inside diameter is a classic mistake: the finished cone comes out small.
This calculator applies that standard shop rule to both ends. It is exact for a cylinder. For a steep-sided cone rolled from thick plate, the diameter "at the edge" also depends on how you measure it and how the edge is cut, so the calculator warns you when that difference could exceed about 0.5 mm. For very thick plate relative to the diameter, the neutral axis moves towards the inside of the bend; allow for a trial roll.
Printing the full-size template
The PDF splits the pattern across as many pages as needed, with the page count shown before you download. The first page has instructions, the key dimensions, a map of the pages, and two calibration rulers (100 mm and 4 in). Every pattern page has its own 50 mm or 2 in check bar.
- Print at 100%, "Actual size" or "No scaling". Never use "Fit to page".
- Measure the ruler with a steel rule. If it is not exact, fix the printer setting before cutting.
- Adjacent pages overlap by 15 mm. Trim the margin along the grey border of each page's left and top edges where it overlaps a neighbour, lay it over that neighbour so the circled cross marks line up, and tape.
- Paper can stretch slightly with humidity. For large parts, check the chord and diagonal dimensions against the table before cutting metal.
DXF and SVG downloads
- DXF (AutoCAD R12 format, the most widely accepted): the arcs are true ARC entities and the edges are LINE entities, with no splines or approximations. Layers:
CUT(outline),SEAM(seam or lap line) andMARK(roll guide lines, and the finished edges when you add end allowances), plusHOLES(fastener holes as true CIRCLE entities) when you add holes. Units are declared in the file (millimetres or inches, whichever you chose). The lower-left corner of the part is at the origin. - SVG: drawn at full size, with the width and height in mm or inches. The same layers become groups, and holes are circles. Text labels are off by default so the file can go straight to a cutter.
- Each file contains one piece. If you split the pattern, cut the stated number of identical pieces.
Allowances, fastener holes, pieces and roll lines
A seam allowance adds a strip of constant width parallel to the seam edge, ending on the extended arcs, for lap joints or grooved seams. The red dashed line marks the true edge. Pieces splits the development into equal segments. This is useful when the pattern is larger than your sheet or almost a full ring. Roll guide lines are straight elements of the cone, drawn at equal angles; keep them parallel to the rolls to avoid a twisted cone.
For a very shallow cone the pattern approaches a full circle. If a seam allowance would make a one-piece pattern overlap itself, the calculator says so and tells you how many pieces to use.
Eccentric (offset) cones and reducers
Open Eccentric (offset) cone and enter how far the small end's centre is moved sideways. Flat back sets the offset to (D − d) ÷ 2, so one side is vertical, as on a flat-bottom or flat-top eccentric reducer. A bigger offset makes the small end overhang (an oblique cone), and equal diameters with an offset give a slanted cylinder, an offset piece of pipe.
An offset cone does not unroll into arcs about one point, so the calculator develops it by triangulation: the straight lines joining the two ends, laid down one after another at their true lengths. Neighbouring lines lie in one plane, so the only approximation is sampling the circles, done finely enough that the template's edges match the circumferences to a few millionths. The seam goes on the short (flat) side or the long side, and a true-length table gives the element and diagonal lengths for marking out by hand. With an offset of 0 the calculator uses the ordinary exact-arc method, and nothing changes.
The eccentric reducer layout guide works a flat-back reducer through by hand, with its full true-length table.
End allowances
Adds material beyond the finished small or large edge for operations such as beading, trimming or forming. The nominal finished edge remains marked on the pattern. Each end has its own allowance, measured along the side of the cone and square to the edge, so on the flat pattern the cut arc simply moves outwards at the large end and towards the apex at the small end. The seam allowance strip and roll lines run out to the cut edges, and the sheet-fit check and the PDF page count use the full cut size. A full cone has no small end, so it takes a large-end allowance only.
Fastener holes
Optionally places a row of holes along the seam overlap for rivets, screws or other fasteners. Check the diameter, spacing and edge distance for your actual material and fastening method. The row runs down the middle of the allowance strip, from the small end to the large end. The first and last holes are the end margin from the finished edges, and the rest are spread evenly between them, no further apart than the spacing you enter. With an allowance on both edges, each strip gets a row. If the holes cannot fit, the calculator says why instead of drawing them. It does not work out how many fasteners a joint needs.
Limitations
- Both ends are circles in parallel planes, centred or offset. Cones with an angled (mitred) end are not supported yet. For a square or rectangular end, use the square to round transition calculator.
- The pattern is geometric. It does not include weld gaps, kerf or springback, and allowances are straight strips along the seam and plain offsets at the ends, not shaped flanges or grooved joints.
- Always confirm critical dimensions before cutting expensive material.
Frequently asked questions
- What is the sweep angle?
- It is the angle of the flat pattern at the apex, the "slice" of a full circle the pattern occupies. It depends only on how steep the cone is: 360° × sin(half apex angle).
- Can it make an eccentric reducer?
- Yes. Open "Eccentric (offset) cone", enter the offset between the centres, or press Flat back, and choose which side the seam goes on. You get the full-size template, the DXF and SVG, and a true-length table.
- Why is the pattern less than a full circle?
- A flat disc would need 360°. The steeper the cone, the smaller the sweep angle; a nearly flat cone approaches 360°.
- How do I make a pattern bigger than my printer paper?
- The PDF tiles it across as many sheets as needed. You can also split it into pieces, or use the chord-offset table to mark it out directly on the metal without swinging a huge radius.
- Can I share a pattern?
- Yes. The page address updates as you type, so bookmarking or sharing the link reopens the same dimensions.
- Is anything I enter sent to a server?
- The calculation, preview and file generation all run in your browser. Your settings are kept in the page address so you can share them; see privacy for what the host and analytics receive.